ShopDreamUp AI ArtDreamUp
Deviation Actions


Suggested Deviants


Suggested Collections


You Might Like…


Featured in Groups

Description
Difficulty: Novice
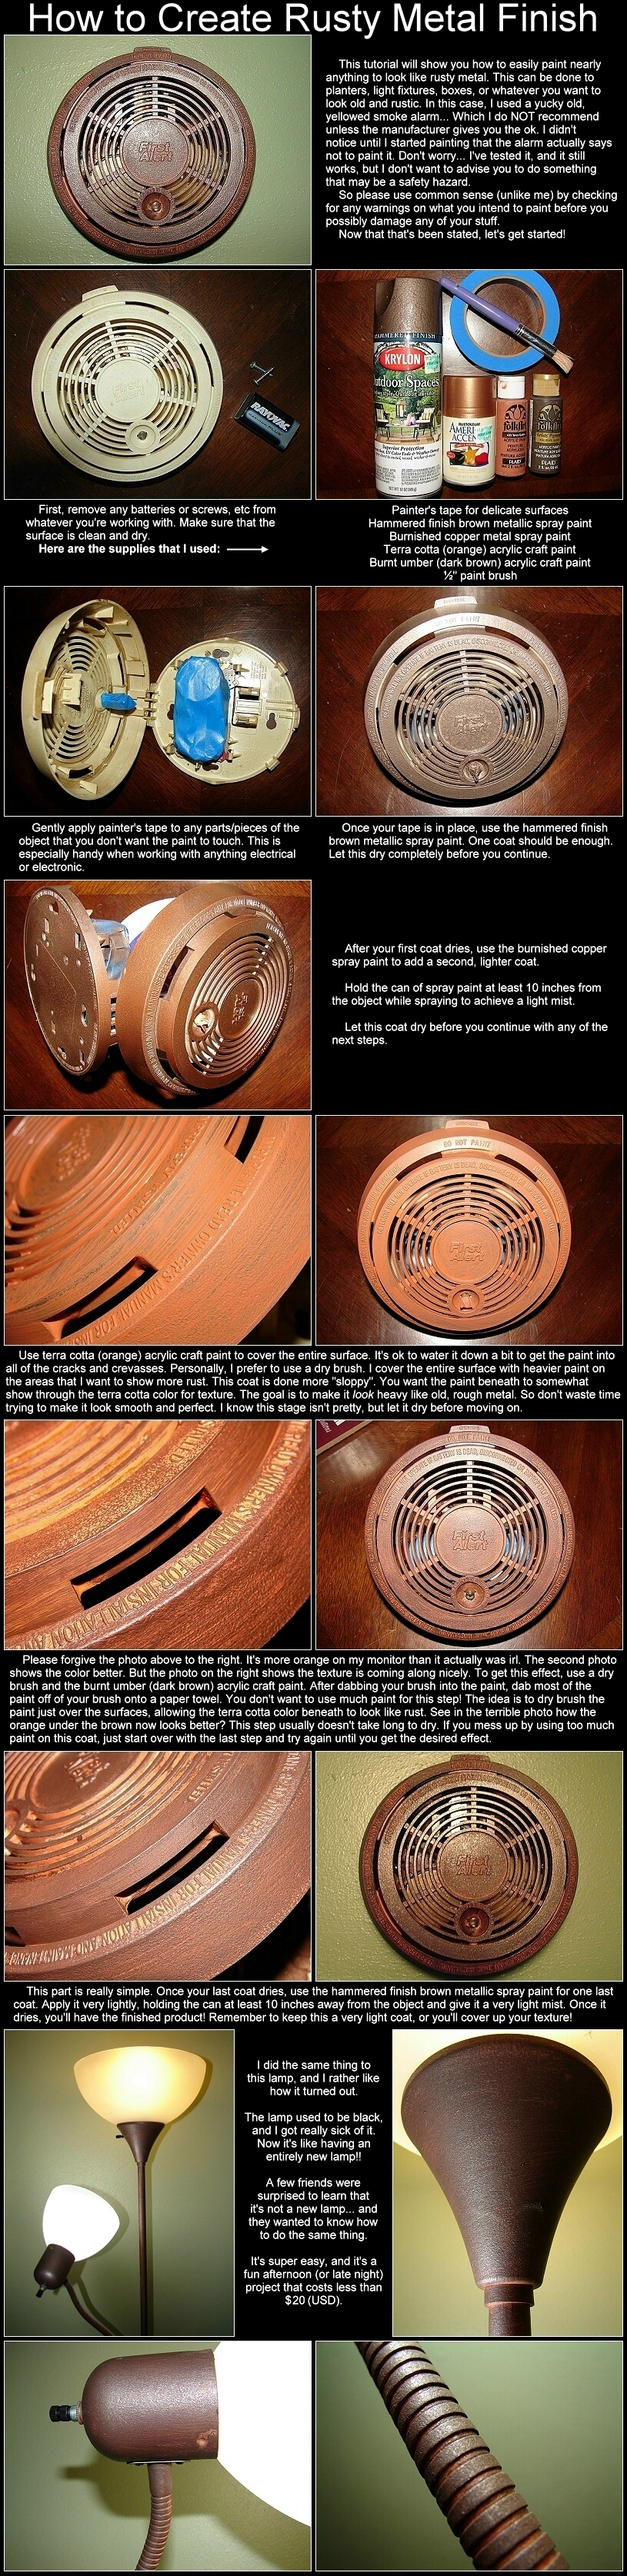
I've recently been doing a few renovations to our home, and I've painted some accents to look like old, rusty metal.
This particular finish is something that's gotten some good feedback from people that have seen it in person. A couple of friends asked me how I did it. This is how in 7 easy steps...
1. Tape parts that you don't want to paint
2. Coat 1 - Hammered finish brown metallic spray paint
3. Coat 2 - Burnished copper metal spray paint (light mist)
4. Coat 3 - Terra cotta (flat orange) craft paint
5. Coat 4 - Burnt umber (flat dark brown) craft paint (dry brush)
6. Coat 5 - Hammered finish brown spray paint (light mist)
7. Gently remove tape after the final coat completely dries
It's important to allow each coat to dry before advancing to each new step. (The word "flat" in steps 4 & 5 means that you want to use paints without shine or gloss. Real rust typically dulls metal surfaces; it's not very shiny.)
This tutorial can be applied to ceramics, plastics, metals, and wood if you have the right kind of paint, so it's simple to use on other arts & crafts and home projects. It's also really handy for Halloween decorations!
Notes about dry brush painting or dry brushing: For those that don't know how, Google offers lots of tutorials for drybrushing techniques if you search "dry brushing painting".
Hey, and not to nag you , but remember to always use a well ventilated area when applying spray paint even for small projects. I don't want you hacking up a lung over some silly need for more rust in your life.
Please leave a link to a photo if you try this tutorial! I'd love to see what you do with it if you use it.

Steampunk Frame by ~Random-Star

Rusted vase by *LucieG-Stock
I've recently been doing a few renovations to our home, and I've painted some accents to look like old, rusty metal.
This particular finish is something that's gotten some good feedback from people that have seen it in person. A couple of friends asked me how I did it. This is how in 7 easy steps...
1. Tape parts that you don't want to paint
2. Coat 1 - Hammered finish brown metallic spray paint
3. Coat 2 - Burnished copper metal spray paint (light mist)
4. Coat 3 - Terra cotta (flat orange) craft paint
5. Coat 4 - Burnt umber (flat dark brown) craft paint (dry brush)
6. Coat 5 - Hammered finish brown spray paint (light mist)
7. Gently remove tape after the final coat completely dries
It's important to allow each coat to dry before advancing to each new step. (The word "flat" in steps 4 & 5 means that you want to use paints without shine or gloss. Real rust typically dulls metal surfaces; it's not very shiny.)
This tutorial can be applied to ceramics, plastics, metals, and wood if you have the right kind of paint, so it's simple to use on other arts & crafts and home projects. It's also really handy for Halloween decorations!
Notes about dry brush painting or dry brushing: For those that don't know how, Google offers lots of tutorials for drybrushing techniques if you search "dry brushing painting".
- What I've learned: Be sure to use a stiff bristled brush when dry brushing. Dry brushing kind of demonstrates the philosophy of "less is more". Add a little paint to the tip of your brush. Then dab most of the paint off of the brush onto a paper towel. Apply very thin amounts of paint over the raised parts of your surface. This allows the coats underneath to show in the little grooves, corners and crevasses of the object. It's the simplest thing in the world just by being very conservative with the amount of paint on the brush. As you probably figured out, dry brushing causes the paint to dry much more quickly.
- Specific technique for this project: This particular dry brushing should be allowed to look streaked, which is the easiest thing to do with acrylic paint. The idea of dry brushing with the above tutorial isn't about adding a solid coat... It's all about creating the illusion of a decaying rusty metal texture by allowing the colors underneath to stay somewhat visible. The only totally solid coat in the above project was the first coat. Because rust generally doesn't form in straight lines, I used slightly more paint on my brush than most dry brush tuts may recommend. It allowed spots of brown get into some of the nooks. This is a good project for beginners because it looks best if it's sort of messy. It's ok to color out of the lines! You kind of need to when making things look like rust.
Hey, and not to nag you
Please leave a link to a photo if you try this tutorial! I'd love to see what you do with it if you use it.
Used This Tut:
Steampunk Frame by ~Random-Star
Rusted vase by *LucieG-Stock
Image size
815x3350px 2.19 MB
© 2009 - 2024 FantasyStock
Comments44
Join the community to add your comment. Already a deviant? Log In
this is interesting thanks